
Linux 高级编程 - Autoconf 打包软件
版权声明:本文为 DLonng 原创文章,可以随意转载,但必须在明确位置注明出处!
Autoconf 简介
Autoconf 是一种用于生成 shell 脚本的工具,可自动配置软件源代码包,以适应多种类型的类似 Posix 的系统。你可以简单地把它看为打包源码的工具,例如你在 GNU 官网下载的那些 xxx.tar.gz 格式的软件包,我们使用这个工具最终目的就是将源代码打成一个包来提供给别人使用。本次就跟大家分享下如何打包一个基本的 Hello World 给别人使用,掌握这个步骤以后就可以类比来打包别的软件包了,首先我们来看看 Autoconf 的基本打包流程。
Autoconf 打包流程
我们使用 Autoconf 打包一个软件包主要依靠下面这张图:
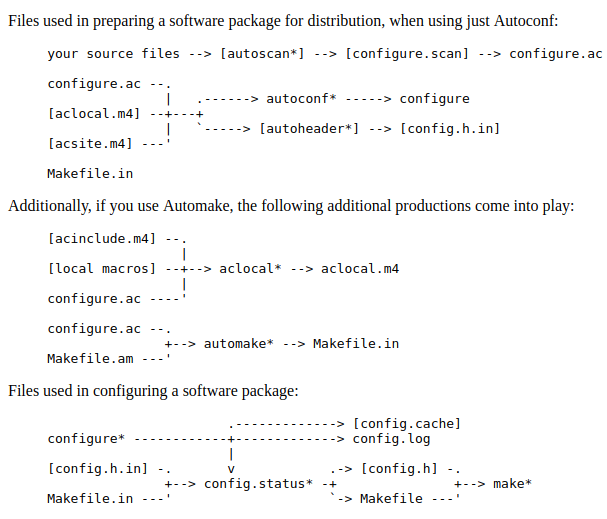
这张图中主要使用了 5 个与 autoconf 相关的工具,我们分别来了解即可,不需要深入学习。
1. autoscan
autoscan 用来扫描源代码目录并生成 configure.scan 文件,这个文件包含了系统配置的基本选项,里面都是一些宏定义,在使用的时候需要将这个文件改名为 configure.ac,并修改相关的配置,我们后面在实际例子中介绍。
2. aclocal
aclocal 是一个 prel 脚本程序,aclocal 根据 configure.ac 文件的内容自动生成 aclocal.m4 文件,这个文件内容是 configure.ac 中的宏展开。
3. autoconf
autoconf 用来产生 configure 文件,这个文件就是我们在手动编译一个软件是要做的第一步:./configure。
4. autoheader
autoheader 自动生成相关的文件,这个功能在源码需要头文件时才使用。
5. automake
automake 可以将 Makefile.am 生成 Makfile.in,但是 Makefil.am 需要我们手动书写。
了解了这 5 个工具,下面我们就来打包一个实际的 Hello World !
实践:Autoconf 打包 Hello World
我们来以一个实际打包 hello.c 的例子来介绍 Autoconf 的基本用法。
安装 autoconf
首先确定你的系统有没有安装 autoconf,在命令行键入 autoconf,如果提示没有安装,则需要先安装:
sudo apt-get install autoconf
编辑 hello.c
我们编写一个 hello.c 作为测试:
#include <stdio.h>
int main(void) {
	printf("Hello World!\n");
	return 0;
}
下面就开始正式打包流程。
1. autoscan
从上面的图中可以看到,第一步我们需要使用 autoscan 来生成 configure.scan 文件:
autoscan
执行的结果除了 hello.c 还有另外 2 个文件:

2. 修改 configure.ac
之后我们还需要将 configure.scan 改名为 configure.ac,并修改以下的 3 点内容:
#                                               -*- Autoconf -*-
# Process this file with autoconf to produce a configure script.

AC_PREREQ([2.69])

# 1. 修改:可执行文件名称,版本号,bug 邮箱
AC_INIT(hello, 1.0, chenghjy@gmail.com)

AC_CONFIG_SRCDIR([hello.c])
AC_CONFIG_HEADERS([config.h])

# 2. 我们后面使用 automake, 所以需要加上这个配置
AM_INIT_AUTOMAKE

# Checks for programs.
AC_PROG_CC

# Checks for libraries.

# Checks for header files.

# Checks for typedefs, structures, and compiler characteristics.

# Checks for library functions.

# 3. 输出文件指定为 Makefile
AC_OUTPUT(Makefile)
3. aclocal
从上图可以看到我们生成 configure 需要 [aclocal.m4] 文件,我们使用 aclocal 来生成:
aclocal
结果生成了 aclocal.m4 文件,如下图所示:

4. autoconf
现在可以使用 autoconf 来生成 configure 啦:
autoconf
结果如下,生成了 configure:

我们直接执行 ./configure 看看是否能够配置成功:
./configure

# 结果
configure: error: cannot find install-sh, install.sh, or shtool in "." "./.." "./../.."
但是结果提示我们缺少一些 shell 脚本,因此我们还需要进行后面的配置。
5. autoheader
如果在 configure.ac 中需要头文件,则需要进行这一步,否则不需要,我们配置了所以需要:
autoheader

6. 编写 Makefile.am
上图中,我们如果要使用 automake 来生成 Makefile.in,则还需要 Makefile.am 文件,但是这个文件需要我们手动编写,具体如何编写,可以查看 automake 官方文档,在下面这个图片位置:

因为我们的 hello 程序很简单,不需要依赖其他的库,所以这里只需要写 2 行:
bin_PROGRAMS = hello
hello_SOURCES = hello.c
7. automake
上面写完了 Makefile.am 文件,现在就可以使用 automake 来生成 Makefile.in 啦:
automake

# 结果
configure.ac:10: error: required file './compile' not found
configure.ac:10:   'automake --add-missing' can install 'compile'
configure.ac:8: error: required file './install-sh' not found
configure.ac:8:   'automake --add-missing' can install 'install-sh'
configure.ac:8: error: required file './missing' not found
configure.ac:8:   'automake --add-missing' can install 'missing'
Makefile.am: error: required file './INSTALL' not found
Makefile.am:   'automake --add-missing' can install 'INSTALL'
Makefile.am: error: required file './NEWS' not found
Makefile.am: error: required file './README' not found
Makefile.am: error: required file './AUTHORS' not found
Makefile.am: error: required file './ChangeLog' not found
Makefile.am: error: required file './COPYING' not found
Makefile.am:   'automake --add-missing' can install 'COPYING'
Makefile.am: error: required file './depcomp' not found
Makefile.am:   'automake --add-missing' can install 'depcomp'
但是出现了一些错误,从提示信息中发现可以使用 automake --add-missing:
automake --add-missing

# 结果
configure.ac:10: installing './compile'
configure.ac:8: installing './install-sh'
configure.ac:8: installing './missing'
Makefile.am: installing './INSTALL'
Makefile.am: error: required file './NEWS' not found
Makefile.am: error: required file './README' not found
Makefile.am: error: required file './AUTHORS' not found
Makefile.am: error: required file './ChangeLog' not found
Makefile.am: installing './COPYING' using GNU General Public License v3 file
Makefile.am:     Consider adding the COPYING file to the version control system
Makefile.am:     for your code, to avoid questions about which license your project uses
Makefile.am: installing './depcomp'
还是有错误,但是这个错误很好解决,它提示 NEWS,README,AUTHORS,ChangeLog 这 4 个文件没有找到,其实这 4 个文件是一个正规软件发布的时候一般都带有的,我们这里新建这 4 个文件即可,就不写内容了:
touch NEWS README AUTHORS ChangeLog

# 再次执行,没有错误信息
automake --add-missing
结果生成了 Makefile.in,这也就是我们配置的最终结果啦:

可以看到目前我们的文件已经很多了,是不是有些正式发布的软件的样子了,其实正式的软件里面的大部分配置文件也是自动生成的。不过我们还差最后一步:打包。
8. 打包
我们使用 make dist 命令直接打包:
# 先要配置得到 Makefile
./configure

# 打包
make dist

# ls 结果
hello-1.0.tar.gz
测试 hello-1.0.tar.gz
下面我们就来测试我们打包的 hello 程序是否可用,我们从配置到最后的卸载一共分为 6 步:
# 1. 配置:./configure
./configure

# 2. 编译:make
make

# 3. 安装:install
sudo make install

# 4. 运行
hello

# 5. 结果,打印 Hello World! 说明成功啦!
Hello World!

# 6. 卸载:uninstall
sudo make uninstall
一路绿灯,说明我们打的包没有问题,那么这个实验也就到此结束了。
结语
本次我们学习如何在 Linux 下通过命令行和 Autoconf 来打包一个程序,我们也知道了从网上下载下的软件包中的那么多文件是怎么来的了,并且我们也实际练习了如何打包一个 Hello World! 给别人使用了。通过这个例子,希望你能够掌握 Autoconf 基本的用法,在以后遇到问题的时候,还望你能主动去 Autoconf 官网 查找资料,做一个主动学习的人。
最后,感谢你的阅读,我们下次再见 :)
DLonng at 07/25/17